
Tired of DeepSeek R1 crashing or freezing on your PC? You’re not alone. When the servers are overloaded or your internet connection isn’t stable, using it online becomes frustrating.
Do you want to run DeepSeek R1 locally? Whether you’re facing login issues, constant errors, or you just care about keeping your data private—you’re in the right place.
In this blog, I’ll show you how to run DeepSeek R1 locally, step-by-step, without needing an internet connection or worrying about privacy concerns. And if you’re a developer or researcher looking to test open-source models offline, this guide will help you too.
We’ve tested it ourselves, and running DeepSeek locally has made everything faster, smoother, and far more reliable.
You’ll also get 4 easy steps you can follow to run DeepSeek or any other open-source model on your own system.
Related Guides
📘 What is DeepSeek? A Beginner’s Guide
🗑️ How to Delete Your DeepSeek Account
Why Run DeepSeek R1 Locally?
Let’s first understand the core reasons why local deployment is not just an option—it’s often the smartest move:
1. Full Data Privacy
Your chats and data never leave your computer. This ensures complete confidentiality, which is especially important for professionals in legal, medical, or corporate environments.
2. Use Without Internet
No more reliance on unstable or slow internet. Once installed, you can use DeepSeek R1 offline with full functionality (except online features like web search).
3. Custom Performance Tuning
By running it locally, you can tweak model size, resource usage, and parameters to suit your device’s hardware. Want a lighter model for a low-end PC? Or a more powerful setup for your GPU? You decide.
4. Cost-Effective
Using DeepSeek R1 locally removes the need for paid API usage. You won’t incur cloud-related expenses, making it ideal for budget-conscious users or teams.
5. Perfect for Regulated Industries
For sectors like healthcare, government, or banking, local AI models help maintain compliance with strict data protection regulations like GDPR or HIPAA.
System Requirements to Run DeepSeek R1 Locally
Before installation, make sure your system meets the minimum requirements:
| Component | Minimum Requirements | Recommended Setup |
|---|---|---|
| RAM | 8 GB | 16 GB or more |
| Storage | 256 GB SSD | 1 TB SSD or NVMe for better speed |
| CPU | Intel i7 / AMD Ryzen 7 | Not mandatory, but preferred |
| GPU | Not mandatory but preferred | Required for larger models |
| Operating System | Windows 10/11, macOS 10.14+, Ubuntu 20.04+ | Latest OS versions preferred |
| Tools | Ollama, Docker, Terminal access | Web UI for browser-based usage |
Complete Setup Guide: How to Run DeepSeek R1 Locally
Let’s walk through the step-by-step installation process.
Step 1: Download and Install Ollama
Ollama is the engine that powers local LLM execution. It must be installed before using DeepSeek R1.
- Go to the Ollama official website.

- Click on Download for your operating system (Windows/macOS/Linux).
- Run the downloaded setup file (
OllamaSetup.exeon Windows). - Follow the on-screen installation instructions.
- Once completed, open Command Prompt and type:
ollama help
If you see the Ollama CLI help guide, it’s successfully installed.
Step 2: Download and Run DeepSeek R1 Locally
- Head over to the official Ollama Model Search Page.
- In the search bar, type DeepSeek-R1 and click on the result.
- Choose the model size based on your system’s capabilities:
- For high-end systems with a strong GPU, select a larger model for better performance.
- For low-spec devices, the
1.5bmodel is recommended for optimal speed and stability.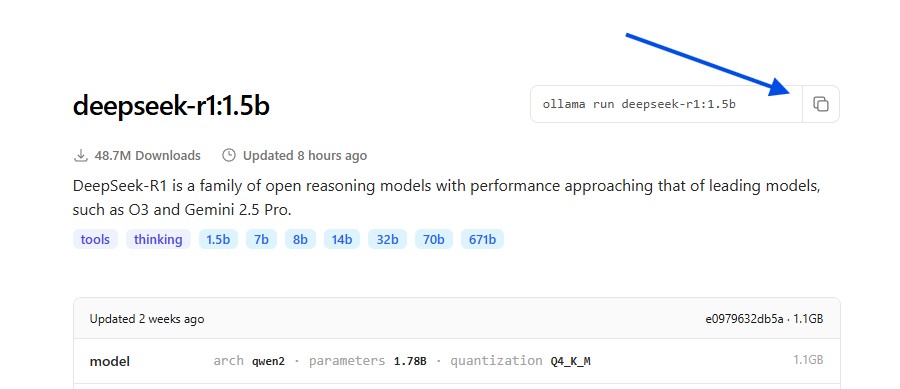
- On the right-hand side of the model page, you’ll find a command—copy it.
- Open Command Prompt or your system’s terminal, paste the copied command, and press Enter.
- Ollama will begin downloading the DeepSeek R1 language model to your system.
- Once the download completes, you can start using the DeepSeek R1 chatbot locally.
- Simply type your message in the terminal, and the DeepSeek model will generate a response instantly—no internet required.
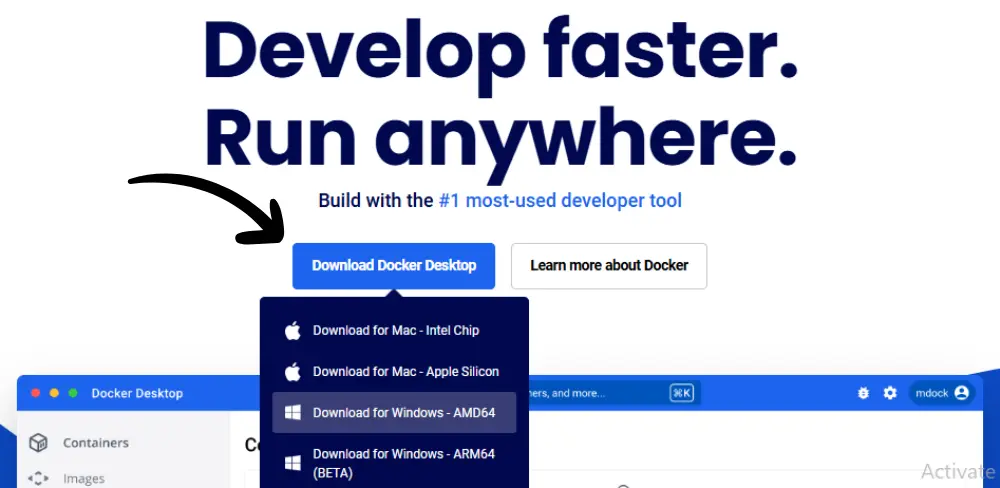
Step 3: Install Docker on Your System
To use DeepSeek R1 through the Open Web UI, Docker must be installed and configured. Here’s how to set it up properly:
- Go to the official Docker website and find the Download section.
- Select your operating system (Windows, macOS, or Linux) and click the corresponding download button.
- Once the installer file is downloaded, navigate to your downloads folder and double-click the setup file.
- Follow the on-screen installation instructions. When the setup is complete, you’ll be prompted to “Close and Restart” your system—make sure to do this.
- After rebooting, launch Docker. Accept the license agreement and click “Finish” to complete the installation process.
- When Docker starts, you’ll see its user interface. Create a Docker Hub account if you don’t already have one.
- Skip the initial setup survey to quickly access the Docker Desktop environment. The Docker Engine will now begin running in the background.
Step 4: Set Up Open Web UI with Docker
Now that Docker is installed, it’s time to configure DeepSeek R1 for use in your browser via the Open Web UI.
- Open the official documentation of Open WebUI or run the below command in terminal.
docker pull ghcr.io/open-webui/open-webui:main
- Scroll down to locate the Docker container run command—typically found in Step 2 of the setup instructions.
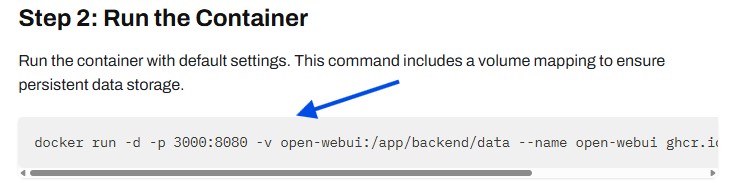
- Open Windows PowerShell or your preferred terminal application, paste the copied command, and press Enter.
- Docker will now begin pulling the necessary image and files to run DeepSeek R1. This may take a few minutes depending on your internet speed and system.
- Once everything is installed, you may be prompted to click “OK” to confirm completion.
- Before launching the UI, ensure that Virtual Machine Platform is enabled on your Windows system. You can check this by opening “Windows Features” from your system settings.
- Now, return to Docker Desktop. You’ll see a container running with numeric ports (e.g.,
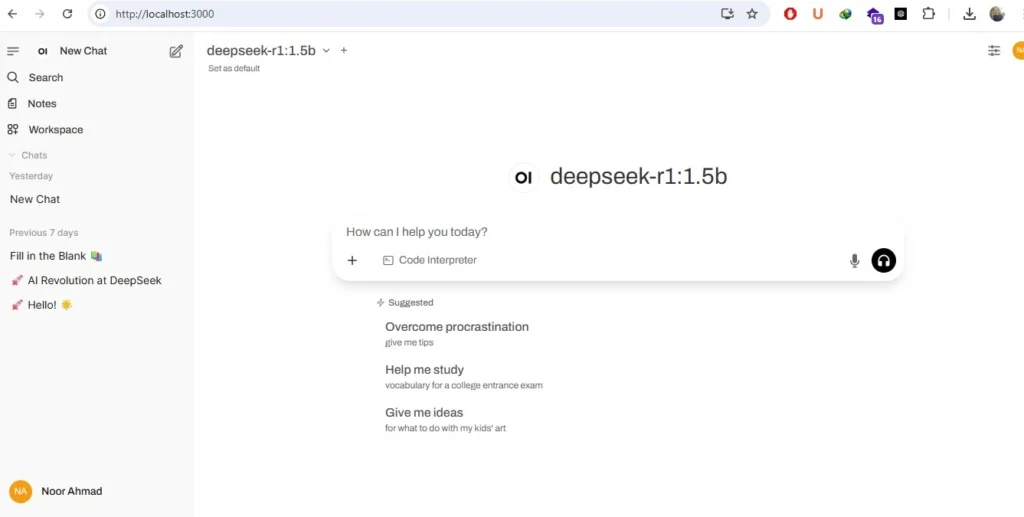
localhost:3000). Click on it, and it will redirect you to your browser.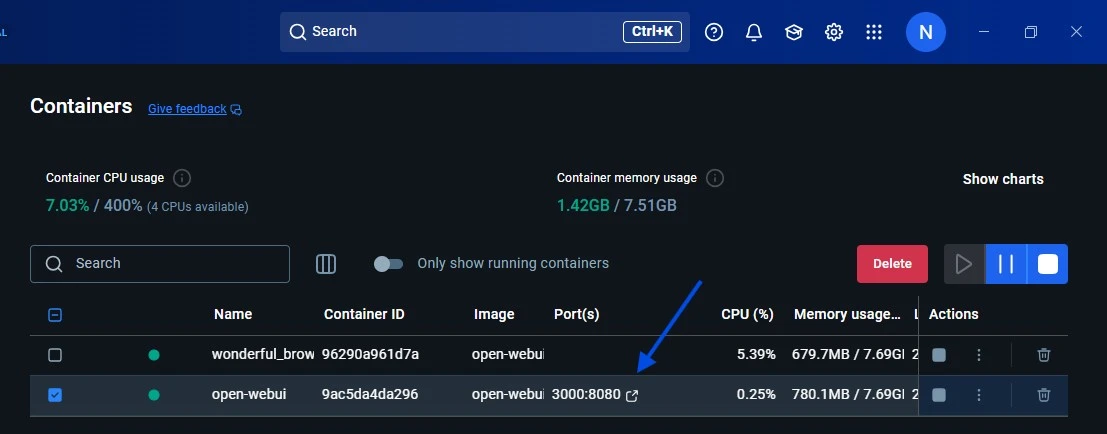
- In the browser window, click “Get Started” to begin using DeepSeek R1 via the Open Web UI completely offline and fully functional, unlimited, without any internet.
Note:
If the model selection is not working properly or you’re facing issues with loading models, try running the following command in your terminal to manually start the Ollama engine:
ollama serveThis will launch the Ollama backend service needed to run and manage your models locally.
Is it compulsory to download and install Ollama for running DeepSeek R1 locally?
Yes, it’s required. Ollama is the core engine that loads and runs AI models like DeepSeek R1. Without Ollama, the model won’t launch or respond locally.
Can I use DeepSeek R1 locally, free of cost?
Yes, it’s completely free to use locally.
There are no API fees or subscription charges.
The only requirement is storage space and system compatibility.
Will DeepSeek R1 work without the internet once it's installed?
Yes, it will. Once all required files are downloaded (Ollama, Docker, DeepSeek model), it runs completely offline. No live server connection is needed afterwards.
What are the limitations of running DeepSeek R1 locally?
There are a few important ones:
Some answers may be limited due to outdated or incomplete training data.
It can’t access real-time internet data.
The “Search” and “DeepThink” tools don’t work offline.
You may experience system lag if your PC doesn’t meet the required specs.
What hardware is needed to run DeepSeek R1 locally?
To run DeepSeek R1 on a CPU, the system should have at least 48GB of RAM and 250GB of free disk space.
However, without a GPU, performance will be slow.
For users with lower-end hardware, DeepSeek also offers distilled models.
These are lighter versions that use fewer resources and still work well for local use.
Final Thoughts
DeepSeek R1 has emerged as a powerful AI tool, but using it online isn’t always reliable. Server overload, frequent errors, and limited access during high traffic can make the experience frustrating.
That’s why running DeepSeek R1 locally has become a practical and effective solution. It offers more control, better privacy, and offline access, without depending on external servers.
This guide walked through everything users need to set it up on their systems, from hardware requirements to installation steps.
By following these instructions, users can enjoy a smoother, faster, and more secure DeepSeek experience right from their own machines.